Laravel 9 Image Upload with Preview

2 years ago admin Laravel

In this tutorial, we are going to see how we can upload images in Laravel 9 with preview using javascript.

I assume that you have already a fresh Laravel 9 application installed, a Post Model, and PostController with create and store methods.


Add methods in PostController

So let's add the create and store methods, the first one renders the form, and the second one stores the post with the image.


<?php

namespace App\Http\Controllers;

use App\Models\Post;
use Illuminate\Http\Request;

class PostController extends Controller
{
    /**
     * Show the form for creating a new resource.
     *
     * @return \Illuminate\Http\Response
     */
    public function create()
    {
        //
        return view('create');
    }

    /**
     * Store a newly created resource in storage.
     *
     * @param  \App\Http\Requests\StorePostRequest  $request
     * @return \Illuminate\Http\Response
     */
    public function store(Request $request)
    {
        //
         $data = $request->except('_token');
         $file = $request->file('photo');
         $image_name = time() . '_' . 'photo'. '_' . $file->getClientOriginalName();
         $file->move('uploads', $image_name);
         $data['photo'] = 'uploads/'.$image_name;
         Post::create($data);
         return redirect()->route('posts.index')->with([
            'success' => 'Post added successfully'
         ]);
    }
}


Create the routes

Inside routes/web.php we add the routes for the methods we have created.


Route::get('post/create', [PostController::class, 'create'])->name('posts.create');
Route::post('post/store', [PostController::class, 'store'])->name('posts.store');
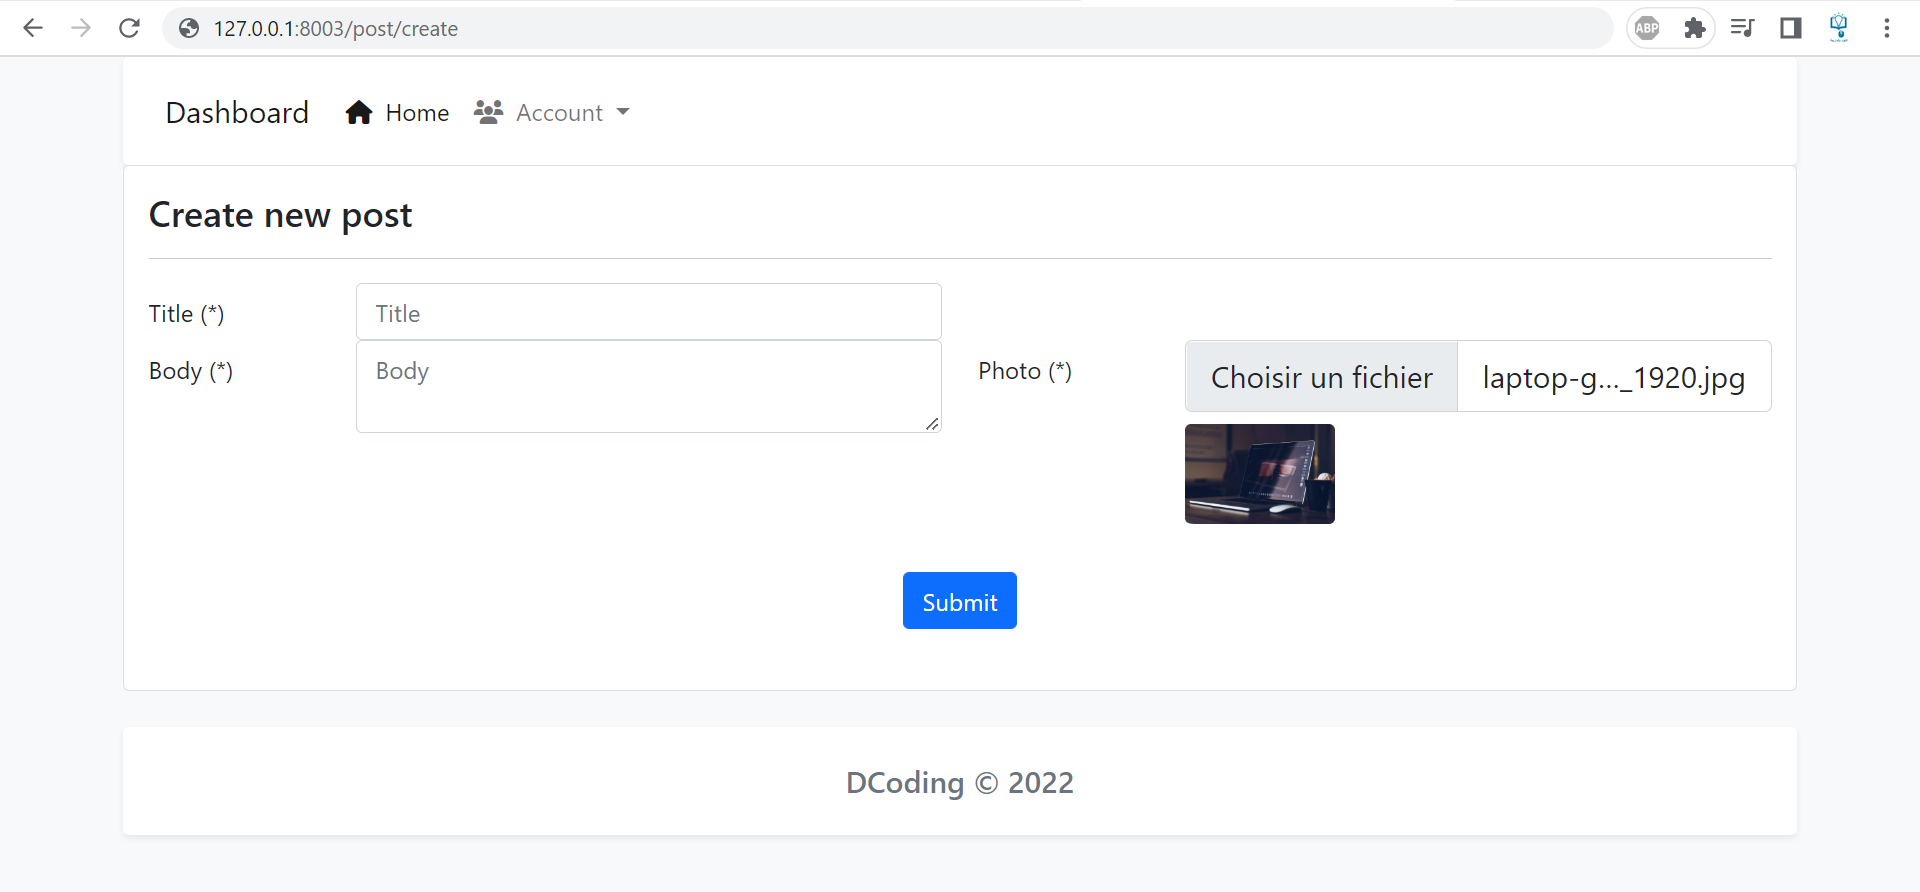
Create blade view

Inside views, we add a new file create.blade.php which holds the form to add the post with the image preview

Photo of a demo


@extends('admin.layouts.main')

@section('content')
    <div class="row">
        <div class="col-lg-12 grid-margin stretch-card">
            <div class="card">
                <div class="card-body">
                    <h4 class="card-title">Create new post</h4>
                    <hr>
                    <form action="{{route('posts.store')}}" method="POST" enctype="multipart/form-data">
                        @csrf
                        <div class="row">
                            <div class="col-md-6">
                                <div class="form-group row">
                                    <label class="col-sm-3 col-form-label">Title (*)</label>
                                    <div class="col-sm-9">
                                        <input type="text" name="title" class="form-control @error('title') is-invalid @enderror"
                                            value="{{old('title')}}" placeholder="Title">
                                        @error('title')
                                            <span class="invalid-feedback" role="alert">
                                                <strong>{{ $message }}</strong>
                                            </span>
                                        @enderror
                                    </div>
                                </div>
                            </div>
                        </div>
                        <div class="row">
                            <div class="col-md-6">
                                <div class="form-group row">
                                    <label class="col-sm-3 col-form-label">Body (*)</label>
                                    <div class="col-sm-9">
                                        <textarea name="body" class="form-control @error('body') is-invalid @enderror"
                                          placeholder="Body">{{old('body')}}</textarea>
                                        @error('body')
                                            <span class="invalid-feedback" role="alert">
                                                <strong>{{ $message }}</strong>
                                            </span>
                                        @enderror
                                    </div>
                                </div>
                            </div>
                            <div class="col-md-6">
                                <div class="form-group row">
                                    <label class="col-sm-3 col-form-label"> Photo (*)</label>
                                    <div class="col-sm-9">
                                        <input type="file" id="photo" name="photo" class="form-control form-control-lg @error('photo') is-invalid @enderror">
                                        @error('photo')
                                            <span class="invalid-feedback" role="alert">
                                                <strong>{{ $message }}</strong>
                                            </span>
                                        @enderror
                                        <div class="mt-2">
                                            <img src="#" id="photo_preview" class="d-none img-fluid rounded mb-2" width="100" height="100">
                                        </div>
                                    </div>
                                </div>
                            </div>
                        </div>
                        <div class="row my-4">
                            <div class="col-md-12 d-flex justify-content-center">
                                <button type="submit" class="btn btn-primary">
                                    Submit
                                </button>
                            </div>
                        </div>
                    </form>
                </div>
            </div>
        </div>
    </div>
@endsection
@section('scripts')
    <script>
        const input = document.getElementById("photo");
        const preview = document.getElementById("photo_preview");
        input.addEventListener('change',function(){
            if (input.files && input.files[0]) {
                var reader = new FileReader();
                reader.onload = function (e) {
                    preview.classList.remove('d-none');
                    preview.setAttribute('src', e.target.result);
                }
                reader.readAsDataURL(input.files[0]);
            }
        });
    </script>
@endsection

Related Tuorials

How to Build a Shopping Cart in Laravel 12 (Step-by-Step) Part 3

In the third part of this tutorial, we will display the products on the home page and add, update, a...


How to Build a Shopping Cart in Laravel 12 (Step-by-Step) Part 2

In the second part of this tutorial, we will add the controllers we need with the function...


How to Build a Shopping Cart in Laravel 12 (Step-by-Step) Part 1

In this tutorial, we will Learn how to create a fully functional shopping cart in Laravel 12. The us...


How to Add a Relationship to a Select in Filament

In this lesson, we will see how to add a relationship to a select in Filament.Let's assume that we h...


How to Generate Slugs from a Title in Filament

In this lesson, we will see how to generate slugs from a title in Filament, Sometimes we need to gen...


How to Change the Order of the Filament Left Navigation Menu Items

In this lesson, we will see how to change the order of the filament left navigation menu items.Somet...


How to Hide the Info Widget on the Filament Dashboard

In this lesson, we will see how to hide the info widget on the Filament dashboard. The info widget i...


How to Add Bootstrap 5 to Laravel 12 with Vite

In this tutorial, we will see how to add Bootstrap 5 to Laravel 12 with Vite, The process is simple...


How to Add Middleware in Laravel 12

In this tutorial, we will see how to add middleware in Laravel 12, Now we can use bootstrap/app.php...


How to Add React js to Laravel 12 with Vite

In this tutorial, we will see how to add React JS to Laravel 12 with Vite. Since version 9.19, Larav...