Build a Shopping Cart Using Vue js 3 Composition API Laravel 11 & Stripe Payment Gateway Part 3
In the third part of this tutorial, we will move to the front end, we will install the packages we need, and will create the components and routes.
Install the package
All the packages we will need are below you can add them to your 'package.json' file and run npm install.
                                                                                                                {
  "name": "frontend",
  "private": true,
  "version": "0.0.0",
  "type": "module",
  "scripts": {
    "dev": "vite",
    "build": "vite build",
    "preview": "vite preview"
  },
  "dependencies": {
    "@stripe/stripe-js": "^3.4.0",
    "@vue-stripe/vue-stripe": "^4.5.0",
    "axios": "^1.6.8",
    "bootstrap": "^5.3.3",
    "bootstrap-icons": "^1.11.3",
    "pinia": "^2.1.7",
    "vue": "^3.4.21",
    "vue-router": "^4.3.2",
    "vue-toastification": "^2.0.0-rc.5"
  },
  "devDependencies": {
    "@vitejs/plugin-vue": "^5.0.4",
    "vite": "^5.2.0"
  }
}
Add routes
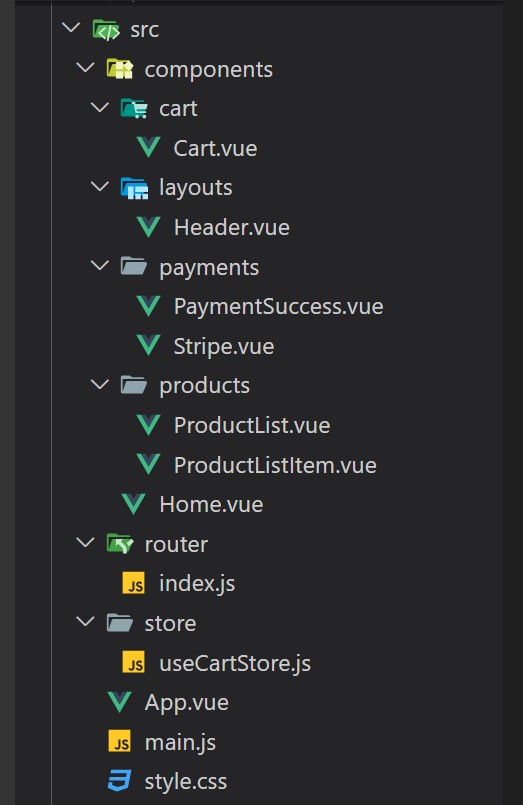
Next, inside src add a new folder router inside add a new file 'index.js' that will hold all the routes we need.
the image below contains the file structure of the front end:
                                                                                                                        import { createRouter, createWebHashHistory } from "vue-router"
import Home from "../components/Home.vue"
import Cart from "../components/cart/Cart.vue"
import PaymentSuccess from "../components/payments/PaymentSuccess.vue"

const router = createRouter({
    history: createWebHashHistory(),
    routes: [
        {
            path: "/",
            name: "home",
            component: Home,
        },
        {
            path: "/cart",
            name: "cart",
            component: Cart,
        },
        {
            path: "/payment/success",
            name: "success",
            component: PaymentSuccess
        },
    ],
})

export default router
Update the file main.js
Inside the file main.js let's add the code below:
                                                                                                                        import { createApp } from 'vue'
import 'bootstrap/dist/css/bootstrap.min.css'
import 'bootstrap/dist/js/bootstrap.min.js'
import 'bootstrap-icons/font/bootstrap-icons.min.css'
import "vue-toastification/dist/index.css"
import './style.css'
import App from './App.vue'
import router from './router'
import { createPinia } from 'pinia'
import Toast from "vue-toastification";

const pinia = createPinia()

createApp(App)
    .use(router)
    .use(pinia)
    .use(Toast)
    .mount('#app')
Update the file App.vue
Inside the file App.vue let's add the code below:
                                                                                                                        <template>
    <div class="container">
      <Header></Header>
      <router-view></router-view>
    </div>
</template>

<script setup>
  import Header from './components/layouts/Header.vue'
</script>

<style scoped>
</style>
Add the header component
Inside the Header Component, we have the navigation menu.
                                                                                                                        <template>
    <nav class="navbar navbar-expand-lg navbar-light bg-white rounded-0 shadow-sm">
        <div class="container-fluid">
            <router-link class="navbar-brand" to="/">
                <i class="bi bi-cart h1"></i>
            </router-link>
            <button class="navbar-toggler" type="button" data-bs-toggle="collapse" data-bs-target="#navbarSupportedContent" aria-controls="navbarSupportedContent" aria-expanded="false" aria-label="Toggle navigation">
                <span class="navbar-toggler-icon"></span>
            </button>
            <div class="collapse navbar-collapse" id="navbarSupportedContent">
                <ul class="navbar-nav mb-2 mb-lg-0 mx-auto">
                    <li class="nav-item">
                        <router-link class="nav-link active" aria-current="page" to="/">
                        <i class="bi bi-house-door-fill"></i> Home </router-link>
                    </li>
                    <li class="nav-item">
                        <router-link class="nav-link" to="/cart"><i class="bi bi-cart-check"></i> ({{store.countCartItems}})</router-link>
                    </li>
                </ul>
            </div>
        </div>
    </nav>
</template>

<script setup>
    import { useCartStore } from '../../store/useCartStore.js'
    //get store
    const store = useCartStore()
</script>

<style>
</style>
